Building Linear Agents in Node.js & Rivet: Full Walkthrough and Starter Kit
In this guide, you'll learn how to build an AI-powered Linear agent that automates development tasks by generating code based on issue descriptions. You'll build a complete application that authenticates with Linear, receives webhooks, and responds to assignments + comments.
This project is built with:
- Rivet's library to manage the agent & authentication state
- Hono for the HTTP server
- Linear SDK for Linear API integration
- AI SDK for AI-powered responses
TL;DR
The core functionality is in src/actors/issue-agent.ts, where the agent handles different types of Linear events and interfaces with the LLM.
Walkthrough
The Linear integration works through the following steps:
- Step 1: OAuth: Users initiate the OAuth flow to install your agent in their Linear workspace
- Step 2: Webhooks: Linear sends webhook events to your server when the agent is mentioned or assigned
- Step 3: Agent processing: Your server processes these events and routes them to the appropriate agent
- Step 4: AI response: The agent generates AI responses based on issue descriptions and comments
The system exposes three endpoints:
GET /connect-linear: Initiates the Linear OAuth flow (src/server/index.ts)GET /oauth/callback/linear: OAuth callback endpoint (src/server/index.ts)POST /webhook/linear: Receives Linear webhook events (src/server/index.ts)
And maintains state using three main Rivet Actors:
- Issue Agent: Handles Linear issue events and generates responses (src/actors/issue-agent.ts)
- Linear App User: Manages authentication state for the application (src/actors/linear-app-user.ts)
- OAuth Session: Handles OAuth flow state (src/actors/oauth-session.ts)
You can read more about actors in the Rivet Actors documentation.
We'll dive in to how these work together next.
Authentication Flow
Before our agent can interact with a Linear workspace, we need to set up authentication using OAuth 2.0. This allows users to securely authorize our agent in their workspace without sharing their Linear credentials. Our app appears as a team member that can be mentioned and assigned to issues.
Step 1: Initial OAuth Request
The user is directed to GET /connect-linear (src/server/index.ts) to initiate the OAuth flow:
- We generate a secure session with a unique ID and nonce
- We store this state in an
oauthSessionRivet Actor - We redirect to Linear's authorization page with our OAuth parameters
For our OAuth scopes, we request:
read- Read access to the workspace datawrite- Write access to modify issues and commentsapp:assignable- Allows the agent to be assigned to issuesapp:mentionable- Allows the agent to be mentioned in comments and issues
Step 2: User Authentication
The user is redirected to Linear and then:
- User authenticates the app with Linear
- Linear redirects back to our OAuth callback
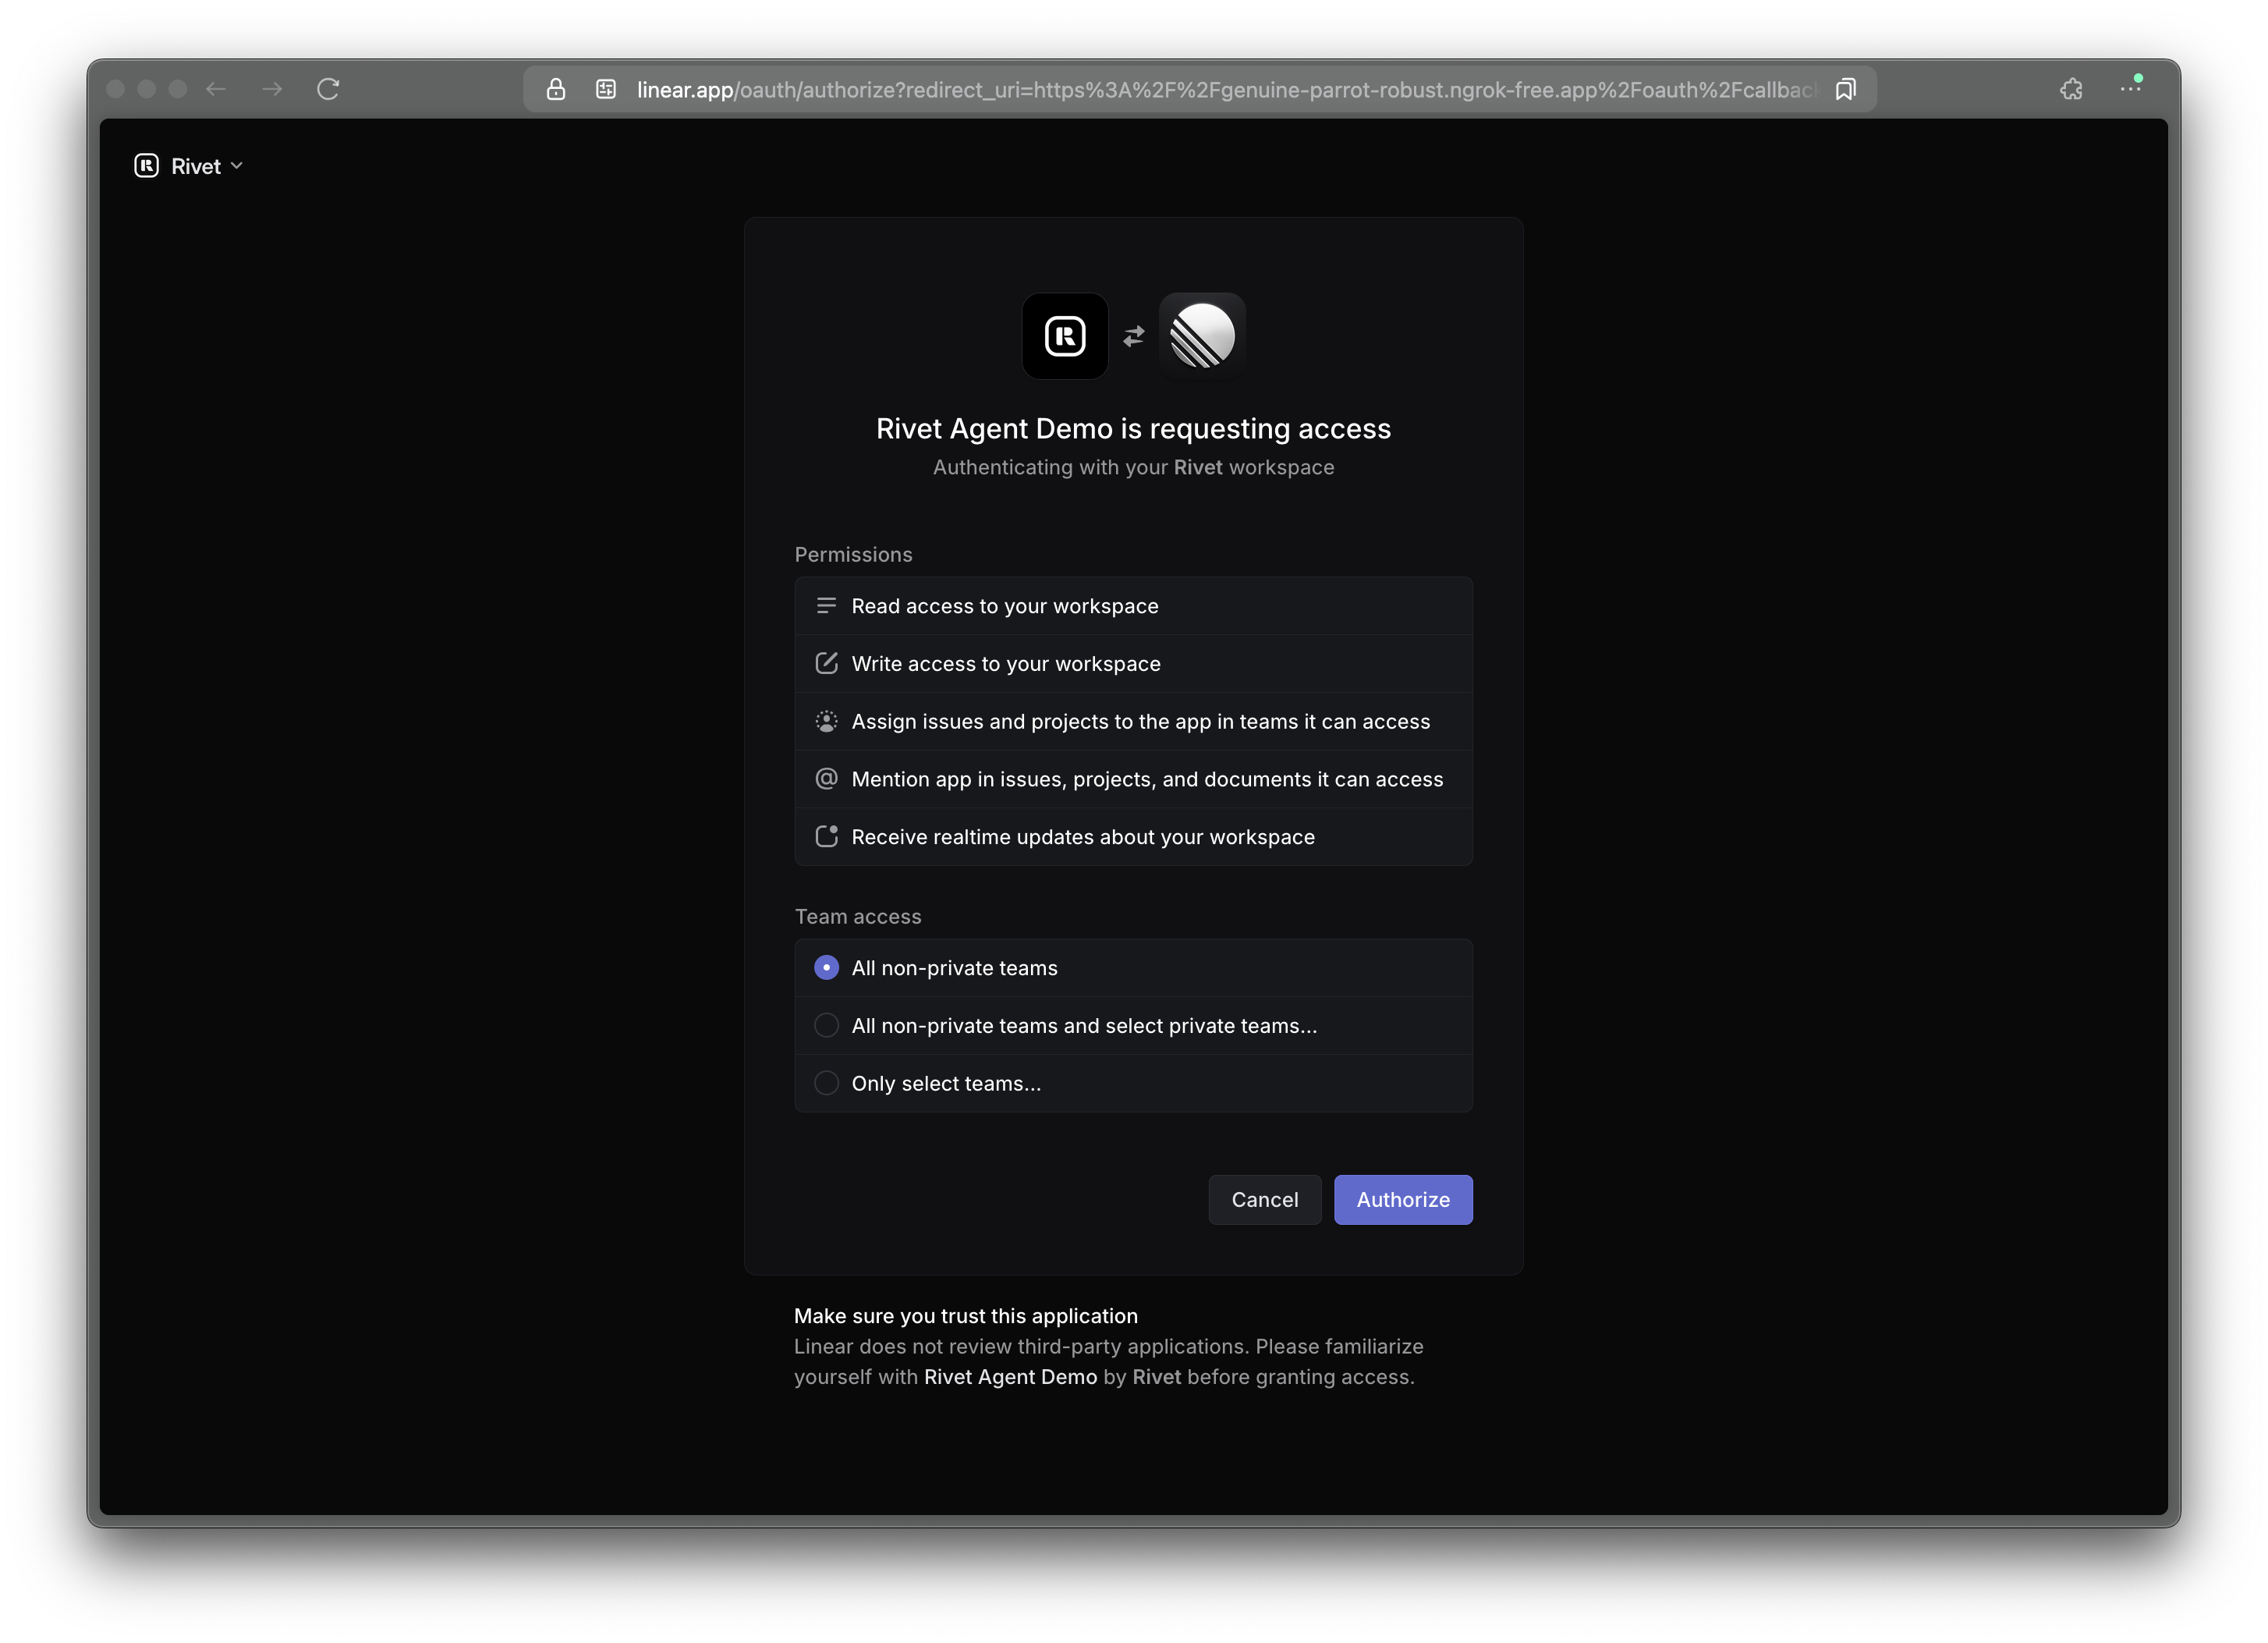
Step 3: OAuth Callback
When the user completes authentication, Linear redirects to our callback URL with an authorization code:
- We validate the state parameter for security
- We exchange the code for an access token
- We get the app user ID for the agent in this workspace (our unique identifier for this workspace)
- We store the access token in the
linearAppUserRivet Actor
After OAuth completes, our agent is fully integrated with the Linear workspace:
- Appears as a team member that can be assigned to issues
- Can be @mentioned in comments and issues
- Receives webhook events when users interact with it
Webhook Event Handling
Once a user has authorized our application in their Linear workspace, Linear sends webhook events to our endpoint whenever something happens that involves our agent.
The server parses these events and routes them to the appropriate handlers in src/actors/issue-agent.ts:
issueMention: Triggered when the agent is mentioned in an issue descriptionissueEmojiReaction: Triggered when someone reacts with an emoji to an issueissueCommentMention: Triggered when the agent is mentioned in a comment (our agent reacts with 👀 and generates a response)issueCommentReaction: Triggered when someone reacts to a comment where the agent is mentionedissueAssignedToYou: Triggered when an issue is assigned to the agent (updates status to "started" and generates code)issueUnassignedFromYou: Triggered when an issue is unassigned from the agentissueNewComment: Triggered when a new comment is added to an issue the agent is involved withissueStatusChanged: Triggered when the status of an issue changes
Here's how we handle webhooks in our server:
Now that we are handling webhook events correctly, we can implement the functionality of our agent.
Agent Implementation
The issue agent is the brain of our application. It handles Linear events and generates AI responses. Importantly, it maintains conversation state by storing message history, allowing it to have context-aware conversations with users.
In your own implementation, you can add extra state to the agent, such as correlated GitHub issues, data from other providers, and more.
When generating responses, the agent calls the AI SDK with a history of all messages:
Demo
Now the authentication, webhooks, and agents are all wired up correctly, we can see everything working together in action:
Building Your Own Agents
Prerequisites
Before getting started with building your own Linear agent, make sure you have:
- Node.js (v18+)
- Linear account and API access
- Anthropic API key (can be swapped for any AI SDK provider)
- ngrok for exposing your local server to the internet
Setup
-
Clone the repository and navigate to the example:
Command Line -
Install dependencies:
Command Line -
Set up ngrok for webhook and OAuth callback handling:
Command Line -
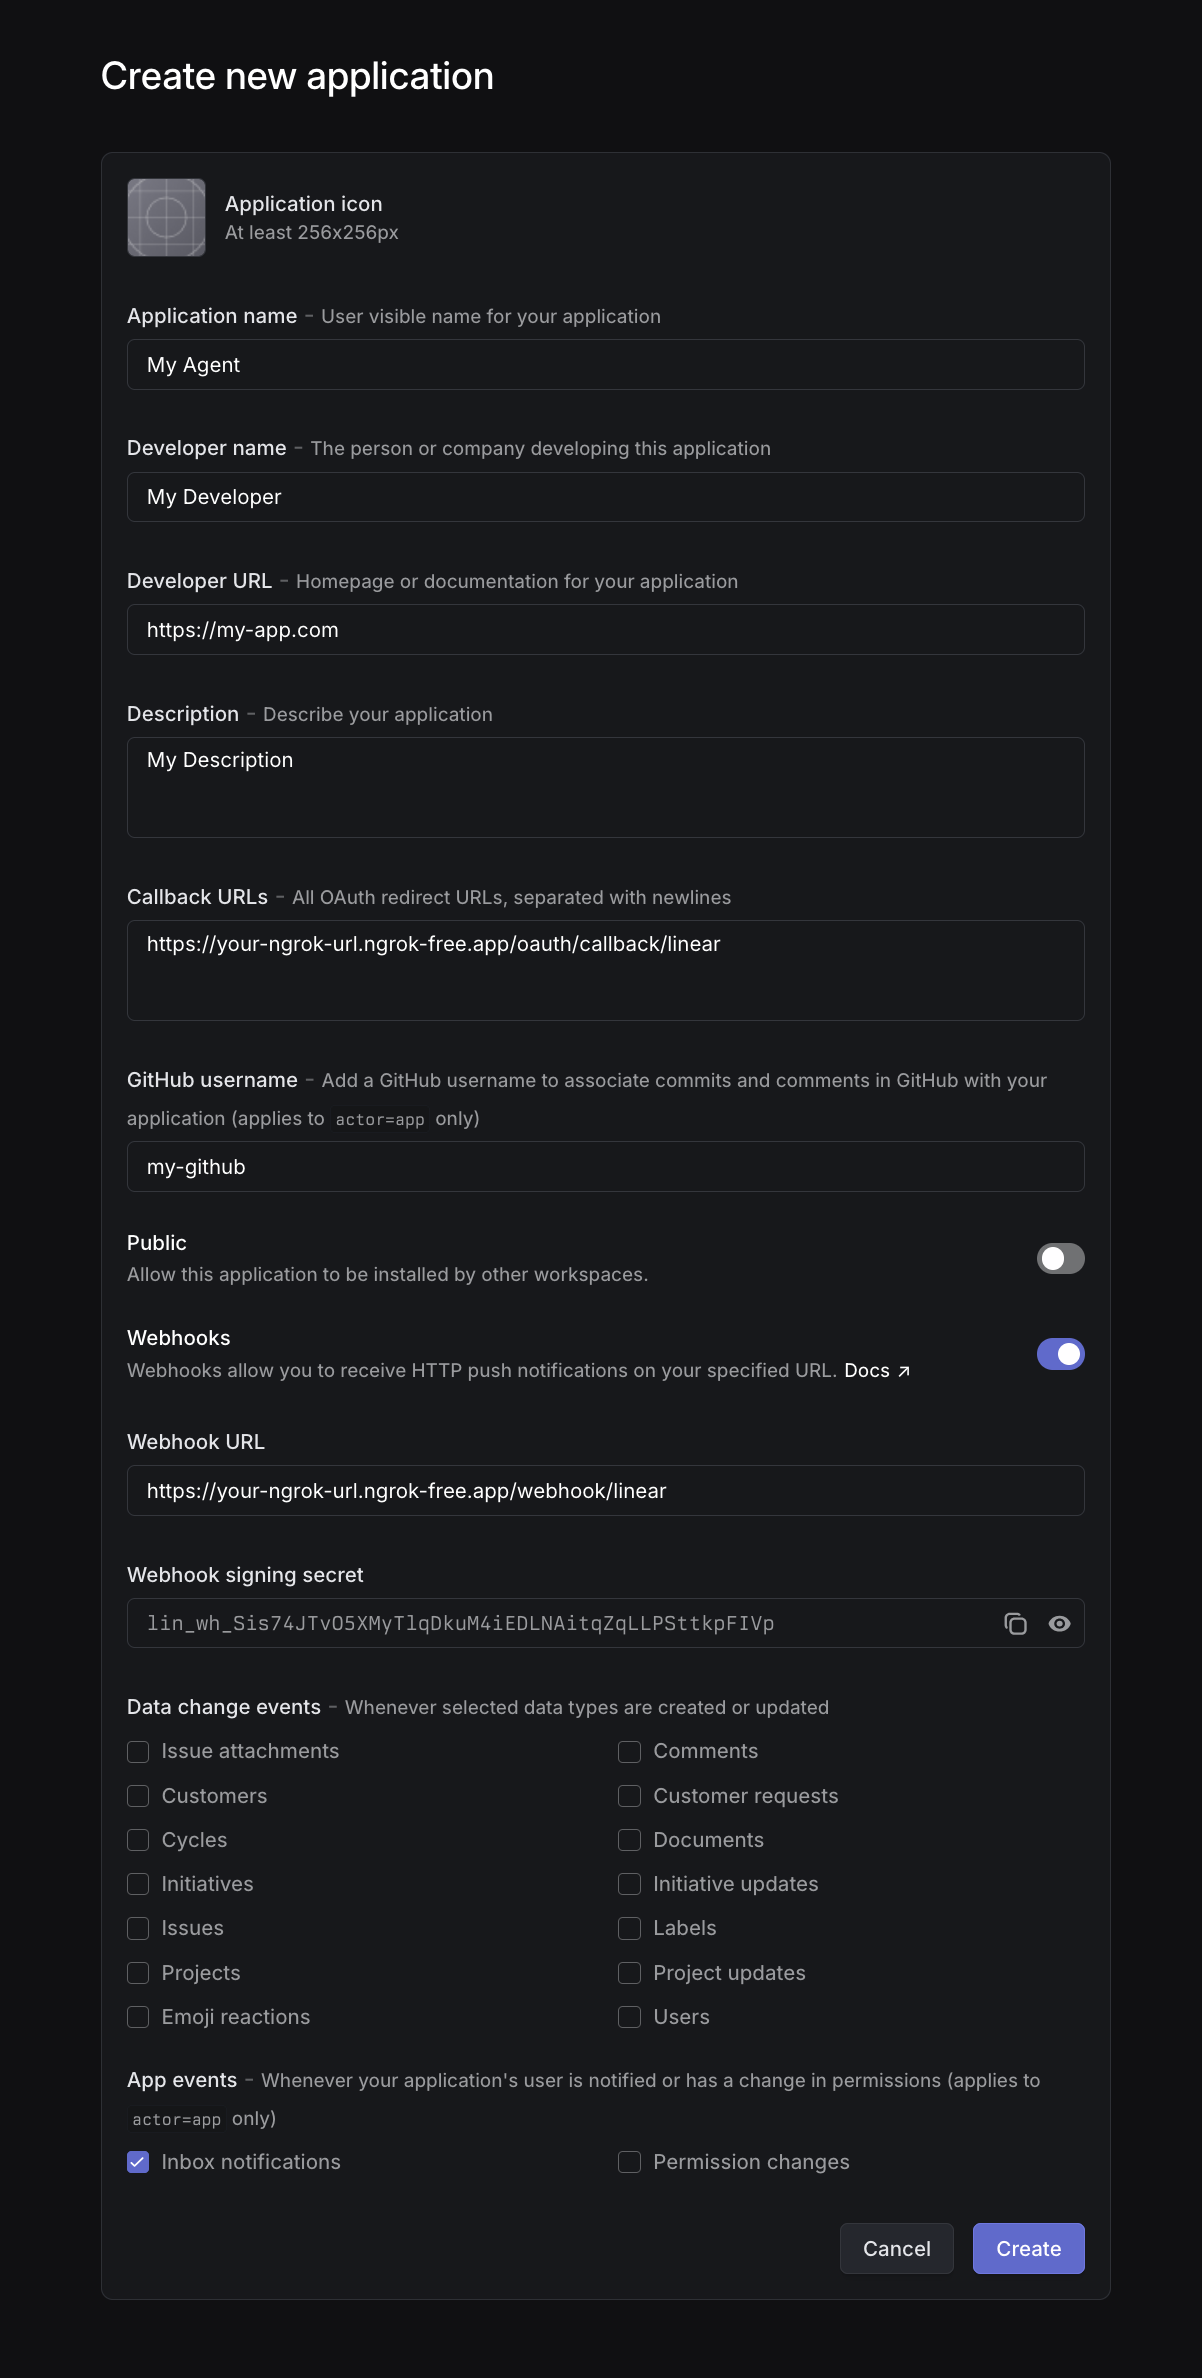
Create a Linear OAuth application:
- Go to to Linear's create application page
- Enter your Application name, Developer name, Developer URL, Description, and GitHub username for your agent
- Set Callback URL to
https://YOUR-NGROK-URL/oauth/callback/linear(replaceYOUR-NGROK-URLwith your actual ngrok URL)- This URL is where Linear will redirect after OAuth authorization
- Enable webhooks
- Set Webhook URL to
https://YOUR-NGROK-URL/webhook/linear(use the same ngrok URL)- This URL is where Linear will send events when your agent is mentioned or assigned
- Enable Inbox notifications webhook events
- Create the application to get your Client ID, Client Secret, and webhook Signing secret
-
Create a
.env.localfile with your credentials:.env.localRemember to replace
YOUR-NGROK-URLwith your actual ngrok URL (without the https:// prefix). -
Run the development server:
Command LineThe server will start on port 5050. Visit http://127.0.0.1:5050/connect-linear to add the agent to your workspace.
Adding Your Own Functionality
The core of the agent is in src/actors/issue-agent.ts. You can customize:
-
Event Handlers: Modify actions for different Linear events:
issueMention: When the agent is mentioned in an issue descriptionissueEmojiReaction: When someone reacts with an emoji to an issueissueCommentMention: When the agent is mentioned in a commentissueCommentReaction: When someone reacts to a comment where the agent is mentionedissueAssignedToYou: When an issue is assigned to the agentissueUnassignedFromYou: When an issue is unassigned from the agentissueNewComment: When a new comment is added to an issue the agent is involved withissueStatusChanged: When the status of an issue changes
For example, you could implement intelligent emoji reactions:
src/actors/issue-agent.ts -
AI Prompt: Customize the system prompt to change the agent's behavior:
src/actors/issue-agent.ts -
AI Model: Change the model used for generating responses:
src/actors/issue-agent.ts
Recommendations for Agent Experiences
When building a Linear agent, consider these practices for a better developer experience:
- Immediate Acknowledgment: Always acknowledge when mentioned or assigned to an issue with a comment or reaction
- Status Updates: Move unstarted issues to "started" status when beginning work
- Clear Communication: Respond when work is complete, leaving a comment to trigger notifications
Full Source Code
You can find the complete source code for this Linear agent starter kit on GitHub: